Introduction:
Ana Rosa is an emulator of the Amstrad PcW16 computer architecture. It is also capable of emulating additional hardware, different options and configurations, etc.
It does not emulate the classic PCW models, since they belongs to a different architecture; they have its own emulator.
The current version of the emulator is 1.0.0, to which this manual refers.
The objective is to achieve an emulation as faithful as possible to the original machine.
Features:
- Everything is included inside one small executable file.
- Emulation of different RAM and Flash sizes (1MB / 2MB).
- Emulation of integrated hardware: MF2HD drives, serial, parallel and ATA ports, PS/2 keyboard, Mouse Systems mouse.
- Note: PcW16 OS doesn't use ATA port (although it has routines for it) nor the secound floppy drive.
- It also emulates:
- PcW16AY (sound + joystick on parallel port).
- Color output.
- Understands the following formats:
- Snapshot: P16.
- Floppy: DSK, IMG.
- Actions: A16.
- Screen: PNG.
- Video: WMV.
- Storage: HDF, RAW / BIN / IMG.
- The interface allows drag and drop.
- A fast mode to manually accelerate emulation when needed.
- Audio and video options, including filters. Supports full screen.
- Automatic fast mode on disc load.
- Fast boot option.
- Can use PC joysticks / pads.
- A debugger with breakpoints at fetch, read, write, input and output, allowing ranges and patters.
- Macros / commands support.
- Audio system with separate mixer for each voice.
Requirements:
- Windows 7 64b.
- An audio device.
Legal stuff:
- I do not assume any responsibility.
- You can do whatever you want with this program.
- All product names, logos, brands, trademarks and registered trademarks are property of their respective owners.
Installation and use:
Installation:
This emulator does not need any kind of installation, simply unzip the contents of the ZIP file in a folder and proceed to execute it.
Additionally, this program supports the automation of commands through the command line, using the same syntax as the macros, which are explained in its corresponding section. It can be used to associate file extensions, using it with external launchers, etc.
On the other hand, the emulated machine does require an installation, since a complete image of the flash is not included by default.
Snapshots:
A snapshot file is a complete state of the machine (including memory, hardware status, disk content, etc.) along with metadata about the emulated machine.
When dragging a file on the window it would be loaded without further ado. If during the release on the window the shift key was pressed, the emulation would be activated if it were deactivated.
Actions:
An actions file is a snapshot together with additional data that describe the events that happened after that moment. It is useful to save tutorials or games in a more compact way than a video.
When dragging a file on the window it would be loaded without further ado. If during the release on the window the shift key was pressed, the emulation would be activated if it were deactivated.
Disks:
A disk file contains the user data of a physical diskette, along with some of its geometric information.
The emulator is capable of loading both CPCEmu DSK files (normal and extended, with or without protection) and raw images with IMG extension.
The emulator works with disk images in memory, with the option to dump them back when extracted. You also have the option to insert them write protected.
When dragging a file on the window it would be inserted on the unit A. If during the release on the window the control key was pressed, it would be inserted in the unit B; if the shift key was pressed, the emulator would be reset and the emulation would be activated if it were disabled (interesting option for boot disks).
Additionally, the emulator allows to accelerate emulation during disk loads.
Videos:
This emulator allows video recording, recording exactly what is shown on the emulated screen together with the sound.
This option requires Windows 7 or latter, and a computer capable of video realtime compression.
Keyboard:
The emulator maps each PC key to the exact same key of the PcW16. When the input is not captured, the emulator keyboard shortcuts do not generate keystrokes, and vice versa: when there is capture, the keyboard shortcuts do not work.
To exit this capture, just press the Application key (between right Windows and right Control), Alt+Control (in that order) or just remove the focus from the application (Windows key, etc.).
Joystick:
The emulator recognizes any joystick / pad that Windows recognizes, by directly mapping the X, Y axis and the first two buttons to the emulated joystick and converting the signal to digital in case of necessity.
Mouse:
The emulator is capable of emulating a PcW16 mouse. To be able to handle the pointer in the emulated PcW16 the input must be captured, which is done by clicking with the right button on the emulated screen. To release it, just press the Application key.
Mass storage:
The emulator is capable of emulating several mass storage devices Flash and ATA. In the first case, it will try to use a file called 1024.bin or 2048.bin according to the size of the flash in the emulator folder. If they do not exist, they will be created, and will require an installation.
In the second case, you can use both raw images and HDF files that include geometric information of the disk.
Given the size of these files, its information is not stored in the snapshots, but a link to the file that contains it.
Interface:
While windowed, the following elements are available:
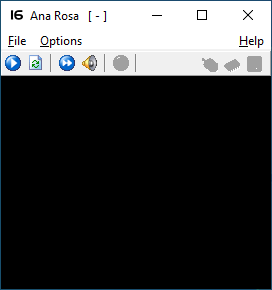
Title:
At the top of the window, like in any other application, there is the title bar.
It has the title of the application and also the file name of the floppy inserted at the A drive.
Finally, it also has the typical icons for minimize, maximize and close the window, with the usual behaviour with one exception: maximize icon activates the full screen mode, which can be canceled pressing Application or Alt+Control.
Menus:
- File
- Snapshot
- Open - Opens a snapshot.
- Save - Saves a snapshot.
- Actions
- Play - Starts playing actions.
- Record - Starts recording actions.
- Stop - Stops the recording or playback of the actions.
- Capture - Saves a screenshot.
- Video
- Record - Starts video recording.
- Stop - Stops video recording.
- Drive A / B
- Insert - Inserts a disk in the drive.
- Extract - Removes disk from the drive.
- New - Creates a new non formatted disk and insert it.
- RO - Reads only disk.
- Dump - Dumps back the disk file if it was modified.
- Exit - Closes the emulator.
- Snapshot
- Options
- Hardware - Open the hardware options. It has its own section in the manual.
- Emulation - Open the options on the emulator. It has its own section in the manual.
- Languages - It has a submenu to choose one of the supported languages, and an auto-detection option.
- Debugger - Open the debugger. It has its own section in the manual.
- Files - Opens the file browser. It has its own section in the manual.
- Persistence - Screen phosphor persistence emulation level. It has 4 levels, from less to more effect.
- Speed - Emulation speed, relative to real machine.
- Scale - Predefined window sizes.
- Start / Stop - Toggles the emulation on / off.
- Fast mode - Toggles between normal and maximum speed.
- Button - Some interfaces have a button, appears when that hardware is selected. Its effect depends on the interface.
- Reset - Restart the emulated machine, like pressing a reset button.
- Hard reset - Restart the emulated machine from zero, like power it off then on.
- Help
- Manual - Open this manual in the web browser.
- About - Displays information about the emulator.
Bar:
Under the menus we have the bar, which is divided into three sections:
- Shortcuts - Shortcuts of different actions present in the menus. These are, from left to right:
- Start / Stop.
- Reset.
- Button (if it exists).
- Fast mode.
- Audio volume.
- Button - The front PcW16 button, active during emulation.
- Macros - Located after the shortcuts, this section has all the macros defined for the emulator. By default, there is only one (represented by "A>"), which inserts a file called cpm.dsk, resets and starts the emulation. They have their own section in the manual.
- Status - Aligned to the right, this section shows us visually the status of different hardware elements. From left to right we have:
- Mouse (input captured).
- Flash.
- Disk.
Screen:
This section represents the emulated computer screen, with its selected visual options.
It allows drag and drop of snapshot, actions and discs files over it.
Hardware:
In this window you can choose the hardware options to emulate. The acceptance of them will cause a reset of the emulation. The options are divided into several tabs:
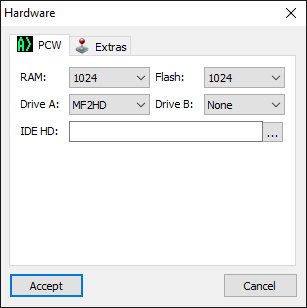

- PcW16 - Define the base model to emulate:
- RAM - Amount of RAM, 1MB or 2MB.
- Flash - Amount of Flash, 1MB or 2MB.
- Drive A / B - Type of disk drive in this unit.
- ATA HD - Disk image to emulate; it may be empty.
- Extras: PcW16AY.
Emulation:
In this window you can choose the options of the emulator. The acceptance of them will not cause a reset. The options are divided into several tabs:

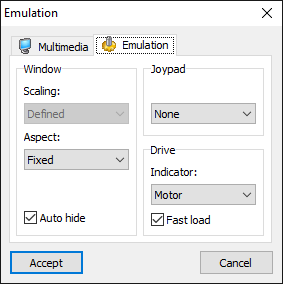
- Multimedia
- Monitor - Type of screen to emulate, color or luminosity on green.
- CRT effect - Displays defined or horizontally interpolated pixels in a similar way to a CRT monitor.
- Border - Overscan area to be displayed.
- Window - Option for window aspect ratio and application theme.
- Emulation
- PcW16AY - Allows you to choose the output levels, normal or linear.
- Drives - Play disk sounds when accessed.
- Low-pass filter - Applies a low-pass filter, which eliminates high frequencies.
- Joypad - Allows the choice of the joystick / gamepad used.
- Drive - Allows you to choose whether the disk indicator lights up at motor signal or command execution. There is also the option of fast loading, which accelerates the emulator while motor signal is active.
- Fast boot - Skips memory check at startup.
Volume control:
The volume control allows you to adjust the overall volume of the emulator, as well as the individual/stereo mix of each audio source.
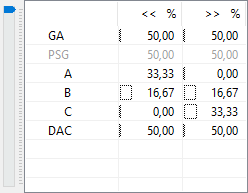
To change a value, simply click on it. By default, each device adds up to 50% to each channel. The cells also display a small VU meter.
It's okay to exceed 100% in total: in addition to DC blocking for each source, there is dynamic range compression.
File browser:
- Under construction.
Advanced use:
Debugger:
The debugger is a floating, resizeable window, and always on top of the emulator. As long as it is open, the emulator works in debugging mode.
When executing code, it acquires some transparency to indicate unavailability and to be able to see what it is underneath. Execution can always be stopped with the Application or Alt+Control.
When not executing code, the current video position will be marked on the PCW screen with two red lines.
The window consists of several sections:
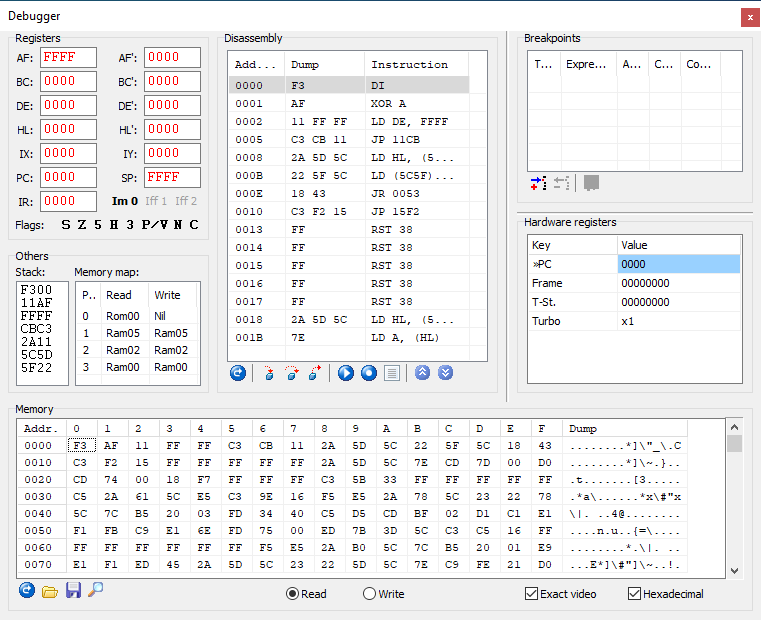
Registers:
This section shows the value of the different Z80 registers, in red if they were modified since the last operation. Their value can be modified directly. A double click follows the adress on code view, with shift on data.
Furthermore you can see the status of the different flags. Double clicking on them changes their value.
Finally, if you are using decimal mode, the values of the registers show their high and low parts separated if the mouse is hovered over it.
Disassembly:
This section represents a memory disassembly, by default from the PC register.
Rows with font in red indicate they have a breakpoint; the one for current PC value has also a bisque background. Double-clicking on a row fills in the data to set a breakpoint in that address.
Below are the following buttons:
- Go To - Changes the start address of the disassembly.
- Step into - Execute only the current instruction.
- Step over - Sets temporary breakpoint at the instruction following the current one, then run.
- Step out - Sets temporary breakpoint at the address indicated at the top of the stack, then run.
- Run - Continues execution.
- Run to - Sets temporary breakpoint at the selected address, then run.
- Tron - Starts / stops execution instruction by instruction mode.
- Up, Down - Browse disassembly. It can also be done using the mouse wheel over the disassembly.
Breakpoints:
This section allows you to define breakpoints. Each one has the following properties:

- Type - The types of accesses for which it occurs. They can be combined between Fetch (X), Read (R), Write (W), Input (I) and Output (O).
- Expression - An expression determines which directions it applies to. It is described below.
- Active - If checked, execution stops at the breakpoint.
- Counter - If checked, Count increases at the breakpoint.
- Count - Value that can be increased with the Counter option.
The buttons down below are for add, remove and edit a breakpoint. A double click over an existing one also edits it, and they can also be dragged to reorder the list.
The expression determines which addresses should cause breakpoint. Its syntax is:
- [Expression]:=[Terms] | [Terms] "=" [Value]
- [Terms]:= [Term] [Terms2]
- [Terms2]:="" | [Terms]
- [Term]:=[Base] [Pattern] | [Base] [Range]
- [Range]:=[Pattern] "-" [Pattern]
- [Value]:=[Base] [Pattern]
- [Base]:= "" | "%" [Pattern]
- [Pattern]:=[Digit] [Digits]
- [Digits]:="" | [Pattern]
- [Digit]:="0" | "1" | "2" | "3" | "4" | "5" | "6" | "7" | "8" | "9" | "A" | "B" | "C" | "D" | "E" | "F" | "X"
Notes on semantics:
- Default base is 16.
- There is not case sensitive.
- Any whitespace, carriage return, etc. is ignored, except between two [Digit]s.
- The base pattern must be a valid natural number between 2 and 16, in base 10.
- In any other context, a pattern must be a valid natural number in its corresponding base, some of its digits can be "X" indicating that any one is valid.
- A pattern that does not explicitly cover all the required bits (16 for addresses, 8 for values) will set the remaining bits to 0. Any extra bits will be ignored.
- [Base] changes the numberic base of the expression from that point onwards.
- If there is a value, it must match the content of the corresponding memory / IO (this version only match XR); if there is not, always matches.
Examples:
- ----O "XXF1" - breakpoint at any change of memory on block 1.
- X---- "%8 X0" - breakpoint at all RSTs.
Others:
- Stack - Shows the last values in the stack. As with registers, double click follows adress on code, with shift on data.
- Memory map - Displays the memory map of the PCW. With a double click on a row the mapping can be changed temporarily.
Hardware registers:
Here the value of some hardware registers is shown; again, in red those that have changed.
Memory:
This window represents a memory dump. The value of each position can be changed by writing a new value on its cell.
Below are the following buttons and options:
- Go to - Changes the start address of the dump.
- Load - Loads a memory dump, starting from the specified address.
- Save - Saves a memory dump, starting at the specified address and length.
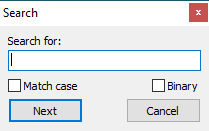
- Search - Opens the floating search window. It allows searching for text strings (case) or binary on memory.
- Read / Write - Those are used to choose which memory to work on, to read or to write (they do not have to be the same).
- Exact video - This option causes the screen to be painted in sync and with previous values as future ones. Otherwise, it is painted at whole from the current state.
- Hexadecimal - This option switches all the views and data inputs between decimal and hexadecimal.
Furthermore, while in debugging mode, certain special Z80 instructions are supported:
- ED FE (DEBUG_BP)- Software breakpoint.
- ED FF (DEBUG)- Debugging API; function in A, parameter in BC:
- 0 - The same as ED FE; BC is ignored.
- 1 - Prints the 0-ended ANSI string pointed by BC, up to 256 characters.
- 2 - Shows the value of BC and allows it's modification before continue.
- 3 - Turns the fast mode off / on, depending on BC being 0 or other value.
- 4 - Resets cycle counter.
- 5 - Transfers cycle counter to BC and HL.
P16 file format:
The PcW16 snapshot format was born from the need to represent everything necessary for emulation (including tapes and discs) in a single file and at the same time to be easily manipulated by the advanced user.
Thus each PcW16 file is nothing more than a ZIP file, which contains other files inside. In this way it can be manipulated with any compressor application.
There are two types of files inside of it: text (INI, readable and editable with any text editor) and data dumps (other extensions, usually BIN).
There are always a "Config.ini" file (hardware configuration of the emulator), a "Hardware.ini" one (state of said hardware), a "Memory.bin" one (RAM dump) and a "Flash.bin" (Flash dump) one present.
Each line in the text files is like "A=B", meaning propery A has value B. Inside "Hardware.ini", the Z80 registers are the "Z80_xxx" properties.
Action files are the same as a snapshot, with an extra file with the port and keyboard data values that must be read.
Macros:
The emulator has a small macro interpreter, which consists in the execution of one or more actions of the emulator.
These can be launched from the command line or stored in the macros folder of the emulator.
In the case of being stored in the folder, these consist of two files with the same name and TXT and PNG extensions respectively. When starting the emulator these are listed and added in the form of buttons to the emulator, into their section of the bar, and can be invoked by pressing said button.
The language of macros is composed of tokens (commands or parameters of commands) separated by blanks (spaces, tabs, carriage returns). In the case that a parameter contains spaces, it can be surrounded with quotes to avoid being fragmented in tokens.
The language is very simple: a succession of separate commands, each one followed by its parameters equally separated. Each command has a short form (one character, less writing) and a long form (one word, more intuitive), both of which can be used interchangeably.
The commands are not case-sensitive. In short form the commands can optionally be preceded by - or /, for compatibility.
The execution of these commands is asynchronous to the emulation if it is active, unless otherwise indicated.
The commands are:
| Short | Long | Description |
|---|---|---|
| 8 | EXIT | Without parameters. Closes the emulator. |
| 9 | WAITK | Without parameters. Waits until the keyboard buffer is empty. |
| @ | EXEC | Take five parameters. The first one is the value of the Z80 register PC, the other four the memory configuration (ports $F0-$F3 of GA). |
| R | RESET | Take an optional parameter. Reset the emulator, and if there is a parameter, it specify a file with the hardware definition to apply, or makes a hard reset if its *. |
| A | DISKA | Take a parameter. If the value is . then remove the disk from drive A, otherwise it inserts the disk image file specified in the parameter. Obsolete. |
| B | DISKB | Same as the previous case, but for unit B. |
| D | DISK | Similar to the previous two cases, but it takes two parameters. The first is the unit (A or B), the second the specified file or if it is . extracts the current one. |
| E | SYNC | Without parameters. "Synchronizes" status (stops the emulator and sets it to normal speed). Obsolete. |
| T | TYPE | Take a parameter. Adds the parameter as string of characters to the keyboard buffer. Supports character # as escape for characters, in hexadecimal two-digit format. |
| W | WAIT | Take a parameter. Waits for the number of milliseconds determined by it. In case the emulation is stopped, it is started. |
| F | FULL | Take an optional parameter. This can be OFF or 0 for window mode, ON or 1 for full screen mode, none for toggle. |
| G | SPEED | Take an optional parameter. OFF or 0 for normal mode, ON or 1 for fast mode, none to toggle. |
| O | TURN | Take an optional parameter. OFF or 0 to stop emulation, ON or 1 to start it, none for toggle. |
| X | EXTERNAL | Take two parameters. Executes the external program indicated by the first with the parameters indicated in the second. |
| P | POKE | Take two parameters. Writes into the absolute memory address indicated by the first the value indicated by the second. Both are numbers in hexadecimal. |
| Q | DEBUG | Without parameters. Opens the debugger. |
| S | SNAPLOAD | Take a parameter. Loads the snapshot file indicated by it. |
| U | SNAPSAVE | Same as previous case, but for saving. |
| Y | BINLOAD | Take two parameters. Loads into the absolute memory address indicated by the first the binary file indicated by the second. |
| Z | BINSAVE | Same as previous case, but for saving. |
Notes:
- Under construction.
F.A.Q.:
- How do I install the operating system? => Just insert an image of the system disk when asked and press the button. Fast mode is recommended because it is a slow process.
- Where can I get games and applications? => Not here. And for copyright reasons I can not tell you where or how to use them.
- How do I run an external program? => Task -> Run External Program; or alternatively press Task+F7. In the dialog box you choose the location (usually disc instead of cabinet and choose from the list that appears).
- How do I use a PcW16? => It's explained on other websites, and also in the PcW16 manual.
- Are you going to port it to Linux? Do you need help to program it? => No, at the moment.
- When will the next version come out? => I do not know.
- Are you going to release the source code? => Not now; there is still a lot to clean up.
- Do you accept donations? => Sure. I accept any PcW16 material.
Common mistakes:
- The second disk drive doesn't work. => The OS does not use drive B.
- The ATA disk doesn't work. => The OS does not use ATA hardware.
More information:
Contact:
- Web: http://www.habisoft.com/pcw16
- EMail: p_c_w [AT] habisoft [DOT] com
Thanks:
- Thank to you for using this emulator, to the Grupo de Usuarios de Amstrad (G.U.A.) and to the PCWWiki.
- Special thanks to: ComSoft6128 for donate a PcW16, G.U.A. (and specially to CPCManiaco and Alt) for donation of a lot of material.
- Finally, thanks to Amstrad for creating the PcW16 and for allowing the redistribution of copyrighted material.
© 2011- HabiSoft.